Hole 1
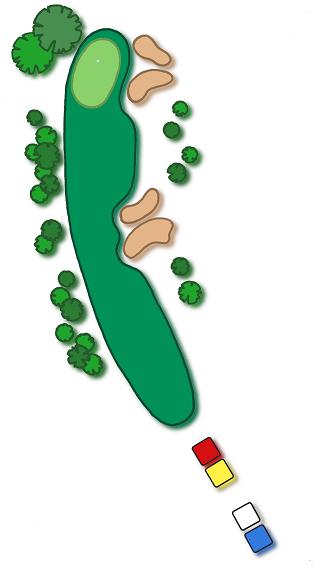
Par 4
Blue Yardage 374
White Yardage 356
Yellow Yardage 332
Red Yardage 327
This slight dog-leg to the right gives a short approach after an average drive. The fairway bunkers are in play for all but the longest hitters as the right-hand side of the fairway offers the shortest distance from tee to green. However, the left-center of the fairway provides the best approach angle. Overall, a relatively easy starting hole.
Hole 2
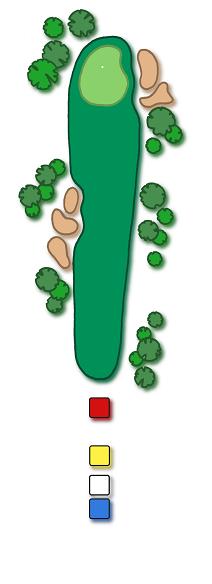
Par 4
Blue Yardage 404
White Yardage 386
Yellow Yardage 350
Red Yardage 257
The second hole is a straightaway par four. Most players favor the right side as the fairway bunkers are in play for the average driver, and out of bounds lurks to the extreme left as well. However, the left offers a better approach with bunkers guarding only the right-hand portion of the green. Too far right on the drive will usually result in tree trouble for the second shot.

Hole 3
Par 5
Blue Yardage 512
White Yardage 494
Yellow Yardage 445
Red Yardage 440
The third hole is the first par five on the course – and offers the longer hitters a chance to arrive in two unless facing a head wind. The hole dog-legs slightly to the left and most players favor the right hand side, but watch out for overshooting the fairway. The average player will hit a second shot to a plateau about 80 yards out leaving a short pitch for getting on in three. The front portion of the green faces the player, but a back pin can be difficult as the green slopes away.
Hole 4
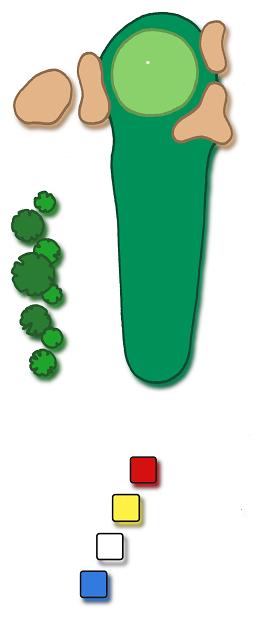
Par 3
Blue Yardage 208
White Yardage 186
Yellow Yardage 177
Red Yardage 164
The fourth hole is among the more difficult of par threes. At a usual distance of 180 yards, a long iron is required by most players. The relatively large green is sloped noticeably from back to front, enabling a run-up shot for those choosing to land short. A shot over the green is trouble as the elevation falls off quickly. Adding to the mix are several large bunkers guarding both sides of the green.

Hole 5
Par 4
Blue Yardage 440
White Yardage 424
Yellow Yardage 382
Red Yardage 279
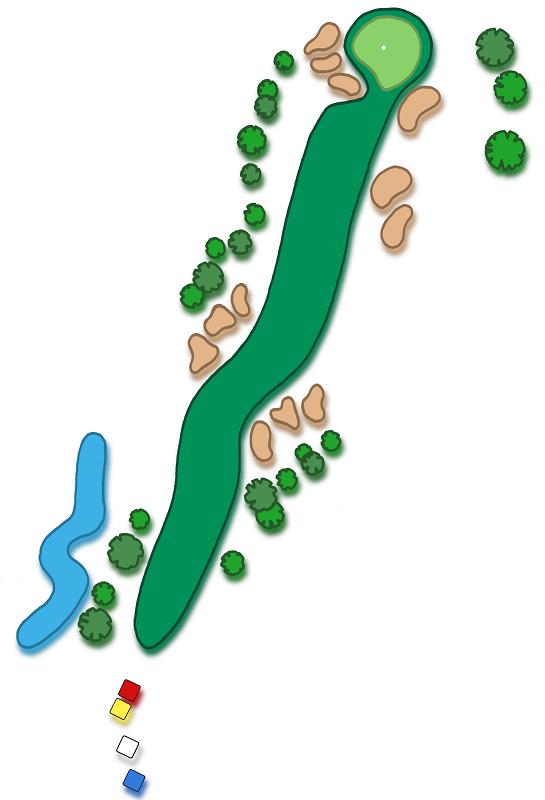
The fifth hole is one the most challenging on the course. The length is primarily responsible for the difficulty, but several well-placed bunkers create a situation where good shots are a must to hole out in 4 or less. The green is slightly elevated and sloped back to front. A pin position on the left-hand side of the green is favorable. A strong tail-wind offers the chance to beat the fairway bunkers on the right – especially with a forward tee position. Overall, a drive to the left hand side is best, and usually offers a mid to long iron for the approach.
Hole 6
Par 5
Blue Yardage 493
White Yardage 475
Yellow Yardage 440
Red Yardage 435
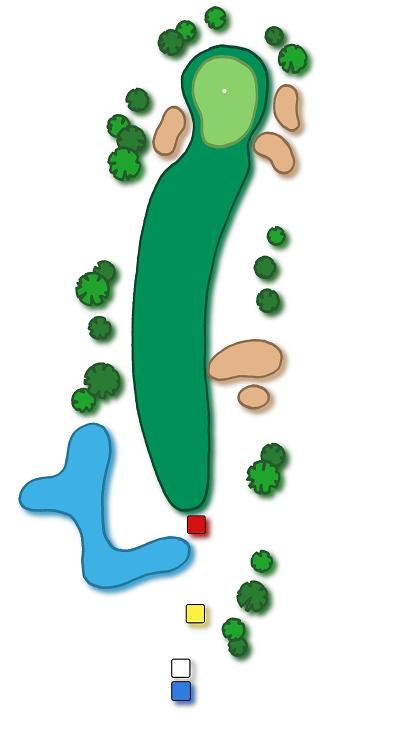
The sixth hole is a relatively short par five, but facing south it often meets with a head wind. The landing area off the tee is also rather narrow as bunkers hug both sides of the fairway. Long hitters can beat the bunkers on the right offering even better potential of arriving in two. The green is also well-protected not only by bunkers but by a slight elevevation making run-up shots nearly impossible. A full-shot approach is often desired on this hole. Water to the left off the tee can be in play on hooked or pulled tee shots.
Hole 7
Par 4
Blue Yardage 411
White Yardage 394
Yellow Yardage 329
Red Yardage 241
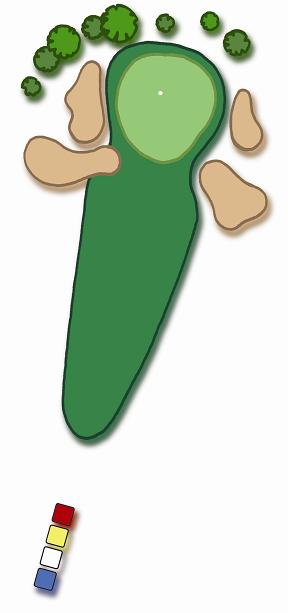
The seventh hole is best played from the left side of the fairway. That location offers both the best approach and avoids the large bunker area to the right. A small inlet of water is just to the left off the tee, but is rarely in play. The green is rather flat with subtle undulation. A pin placed back left can make for the most difficult approach.
Hole 8
Par 3
Blue Yardage 151
White Yardage 131
Yellow Yardage 120
Red Yardage 112
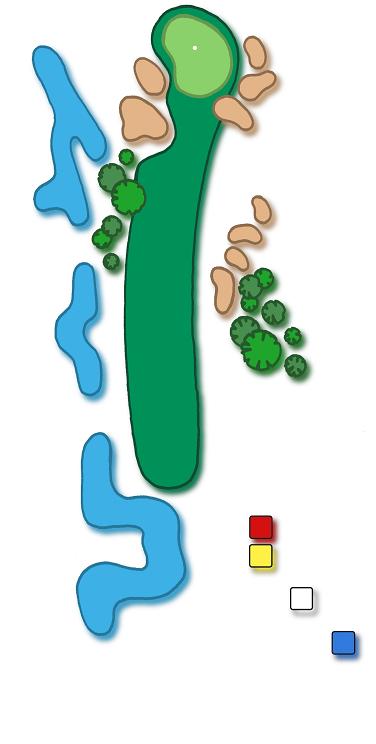
The eighth hole is the easiest of the par 3’s. The short tee shot requires appropriate club selection, however, as the green has many good pin positions and long putts are not easily holed. Several bunkers guard this green on all sides.
Hole 9
Par 4
Blue Yardage 355
White Yardage 335
Yellow Yardage 322
Red Yardage 317
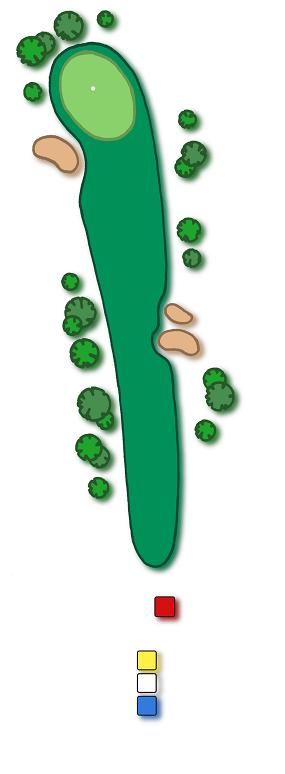
The ninth hole offers a definite scoring opportunity, but not without potential trouble. The tee is offset to the right of the fairway bringing the fairway bunkers into play unless a short tee shot is played to the left half of the fairway. An approach from there will be a mid-iron whereas an approach the skirts the right edge of bunkers leaves a short pitch. Most average to long hitters can beat the fairway bunkers with a good drive and/or a moderate breeze behind them. The ninth hole offers a definite scoring opportunity, but not without potential trouble. The tee is offset to the right of the fairway bringing the fairway bunkers into play unless a short tee shot is played to the left half of the fairway. An approach from there will be a mid-iron whereas an approach that skirts the right edge of the bunkers will leave a short pitch. Most average to long hitters can beat the fairway bunkers with a good drive and/or a moderate breeze behind them.
Hole 10
Par 4
Blue Yardage 431
White Yardage 413
Yellow Yardage 388
Red Yardage 295
The 10th hole is staightaway, but moderately long and usually met with a headwind. Avoiding the bunkers mid-way up the righthand side of the fairway is key, but the right half of the fairway offers the best approach in most cases.

Hole 11
Par 3
Blue Yardage 205
White Yardage 185
Yellow Yardage 167
Red Yardage 162
The 11th hole plays as one of the hardest par 3’s on the course. The green slopes gently down towards its center making edge pins difficult to hit close. The length of the hole is deceptively short, but often requires a long iron for most hitters unless pushed by a tailwind. Playing to the center of this well-guarded green is crucial.

Hole 12
Par 5
Blue Yardage 553
White Yardage 535
Yellow Yardage 477
Red Yardage 472
The 12th hole is the second longest of the par 5’s and has a rather unique signature. Off the tee one must avoid the left altogether as trees, out of bounds, and a water hazard can all be found on that side. Playing to the right side is much safer but flirts with a set of bunkers. On the second shot, a large tree stands in the middle of the extra-wide fairway. There is plenty of room to hit to either side, but a relatively straight shot on this approach is not always the best. Out of bounds still lurks left, and bunkers guard the approach right of the tree. However, once in position, the 3rd shot is rather short, but the green slopes away quickly to the right side and any putt above the hole can be treacherous.

Hole 13
Par 4
Blue Yardage 404
White Yardage 386
Yellow Yardage 352
Red Yardage 274
The 13th plays along the railroad tracks and like number 12 the left side only brings trouble with out of bounds, trees, and sand. The right side also offers the best approach for most pins. The hole is only of moderate length, but going too far right may impair one’s approach as many trees abound.
Hole 14
Par 3
Blue Yardage 180
White Yardage 159
Yellow Yardage 146
Red Yardage 141
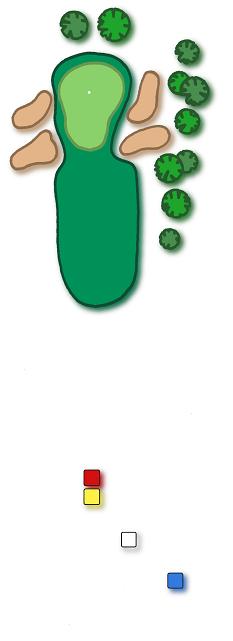
The 14th has slightly offset tee boxes and is surrounded by bunkers on all but the back side. Club selection is crucial here as the wind can often be tricky and the green slopes from front to back. Even though long is safe from sand, a chip back up the hill and down to the hole is no easy par. The only bail-out is front left where a short pitch into the face of the uphill green makes the hole somewhat easier.

Hole 15
Par 4
Blue Yardage 399
White Yardage 378
Yellow Yardage 356
Red Yardage 351
The 15th is the Signature Hole of the Links. One of the more interesting holes, it can be played many different ways. With tees offset nearly 45 degrees from the fairway, one can select many landing points off the tee. A drive that skirts the water hazard on the right offers just a short iron approach while playing safely left of the water may leave nearly 200 yards to the green. Once in the fairway, the green itself is yet another obstacle to navigate. The entire surface slopes rather drastically left towards a pond that collects any pulled or over-drawn shot. Bunkers guard the right side, but playing directly to any pin left of center runs the risk of finding the water. And in case you think long is safe – out of bounds sits a mere 30 feet or so beyond the green. Good Luck!
Hole 16
Par 4
Blue Yardage 436
White Yardage 418
Yellow Yardage 389
Red Yardage 291
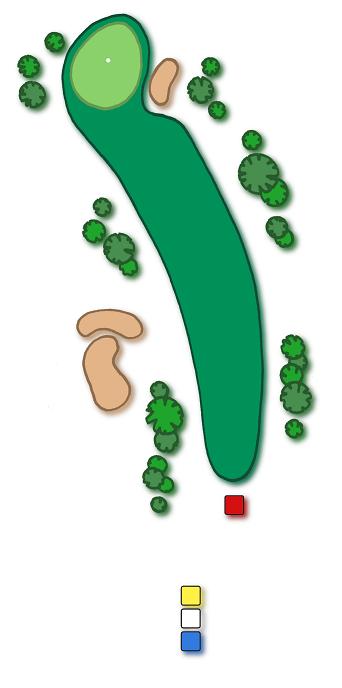
The 16th hole plays the longest of any of the par 4’s as it slopes steadily uphill. The fairway is rather wide but a drive with some distance is necessary in order to avoid hitting long irons or fairway clubs into the green. The hole dog-legs left, so hitting up the left side shortens the hole somewhat, but well-placed bunkers are hard to beat without a strong tailwind. The green is large with only a couple of small bunkers on the right side, so left is best. However, many subtle undulations make this green difficult to putt from all but the back locations.
Hole 17
Par 4
Blue Yardage 332
White Yardage 310
Yellow Yardage 301
Red Yardage 291
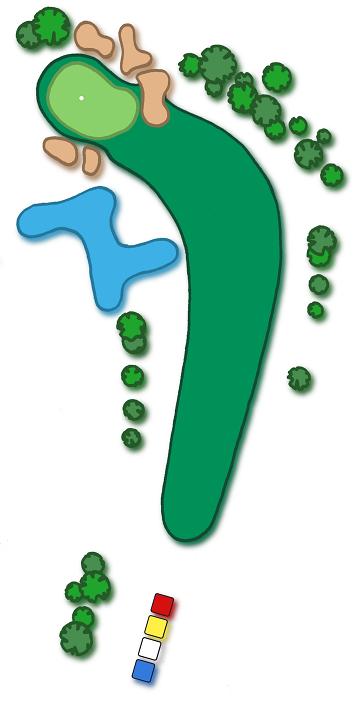
The 17th hole offers a last ditch scoring opportunity. At just over 300 yards, many hitters try to get within a wedge distance for their approach shot. But, a winding water hazard guards the shortest approach along the left-hand side of the fairway. Long hitters can carry the water inlet near the dog-leg turn, but the sharpness of the turn can put long, straight drives into a dense grove of pine trees. Many players will simply play two irons from tee to green which still offers an excellent birdie opportunity. But any wayward shot can quickly turn the hole into a bogey or worse. Playing a long to mid-iron down the left-hand side of the fairway is usually the best.

Hole 18
Par 5
Blue Yardage 548
White Yardage 530
Yellow Yardage 465
Red Yardage 460
The 18th is a great finishing hole. With water running nearly the length of the hole on both sides, many things can happen. While the hole is not short, accuracy is paramount. Avoiding the water can lead to a scoring opportunity, but the slightly elevated green and offset fairway make the final approach somewhat uneasy. Bunkers guard the approach from all but one angle, and watch going too far over the green and rolling out of bounds. Overall, a hole that can decide a match!
